
💎 DIY Guide: How to Customize Your 925 Silver Earrings
Add Charms, Stones, and Personal Touches That Make Them Uniquely Yours
If you love silver jewelry, there’s nothing more exciting than giving it a personal touch. Whether you're a small jewelry business owner, a creative DIY lover, or just someone looking to refresh your accessories — this guide is for you.
We’ll walk you through how to customize 925 sterling silver earrings using charms, stones, and simple techniques. No special experience is needed — just some creativity, the right tools, and a bit of inspiration. Ready? Let’s dive in.
🌟 Why Personalize Your Silver Earrings?
Customizing silver earrings is more than a trend — it’s a way to:
- Express your personality: Add symbols, colors, and elements that reflect your story or mood.
- Stand out: A custom piece is always more eye-catching than something mass-produced.
- Add value to your brand: If you’re a small business owner, personalized pieces increase your product range, attract more attention, and create deeper customer connection.
- Make smart use of stock: Using small components like charms and stones helps you get more creative with what you already have — reducing waste and cost.
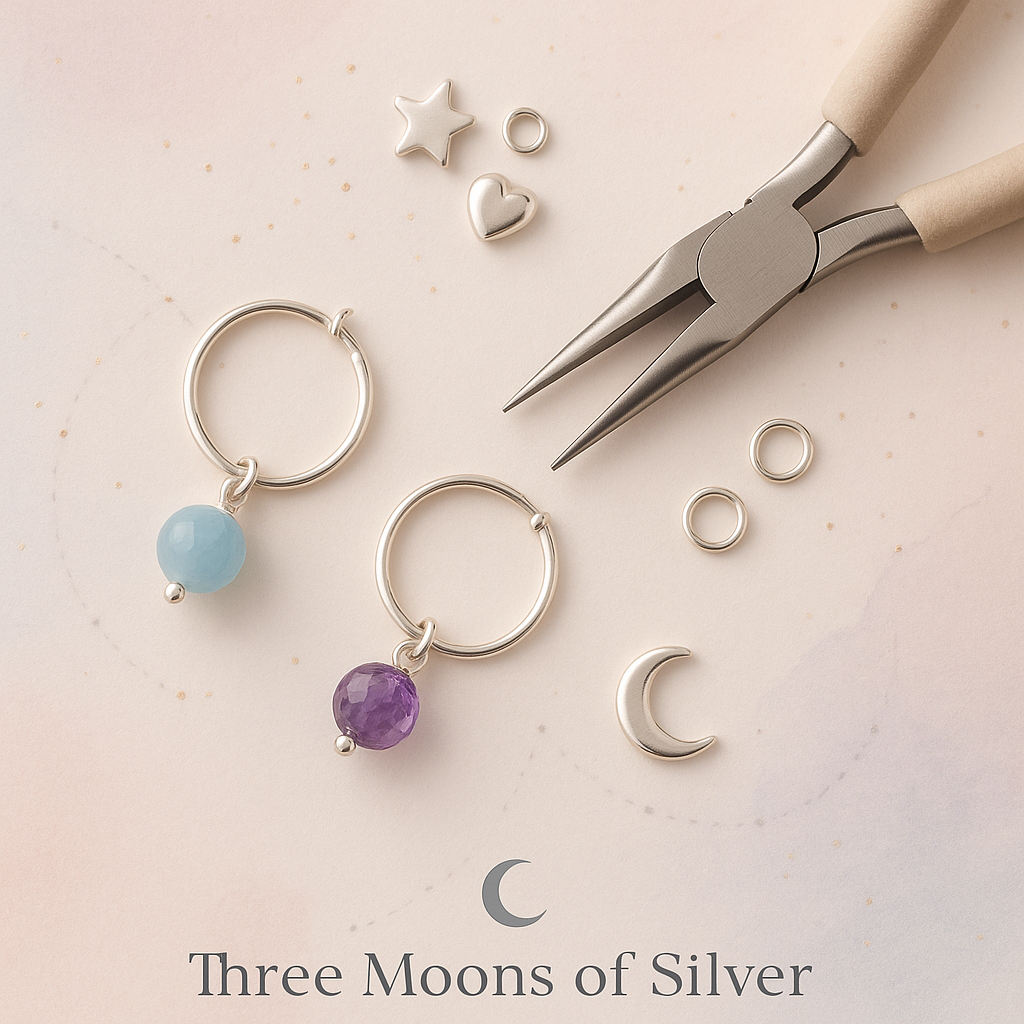
🧰 What You’ll Need to Get Started
Customizing your earrings is simple if you have the right materials. Here’s a quick checklist:
➤ Base Earrings
- Sterling silver hoops – Great for adding dangling charms or beads.
- Studs – Ideal for attaching stones or glue-on components.
- Threader or drop earrings – Elegant and easy to modify with light elements.
➤ Charms & Connectors
- Small pieces like initials, animals, stars, moons, or symbols.
- Choose sterling silver charms or mix metals for contrast.
- Make sure they come with a small loop or ring for easy attachment.
➤ Gemstones or Crystals
- Use semi-precious stones like quartz, amethyst, or onyx.
- Cubic zirconia (CZ) is a great affordable option that shines beautifully.
- Crystal donuts or flat-backed gems are perfect for hoop or stud designs.
➤ Tools
- Jump rings – Little metal loops that connect charms to earrings.
- Round-nose pliers – For bending and closing rings or wrapping wire.
- Wire cutters – To trim excess wire or chain.
- Jewelry glue (optional) – Like hypo cement for secure stone attachment.
🛠 Step-by-Step: How to Customize Your Earrings
Here’s a simple way to transform basic earrings into personalized creations:
1. Choose Your Base
Start with your silver earring base. Hoops work well if you want something versatile. Studs are more minimal, but you can still add sparkle or symbols.
2. Pick Your Charms or Stones
Choose one or two small charms that speak to your style or message. If you’re adding stones, think about color combinations or birthstones for extra meaning.
3. Attach with Jump Rings
Open the jump ring using pliers by twisting gently (never pulling apart).
Slide the charm onto the ring, attach it to the earring base, and close the ring tightly.
4. Add Stones (if using glue)
For stud earrings, apply a tiny drop of glue to the back of a flat stone. Place it on the earring post and let it dry completely — usually 24 hours.
5. Check, Clean, and Wear
Once everything’s attached, gently tug to check security. Polish the earrings with a soft cloth, and you’re ready to shine!
💡 Creative Ideas to Try
- Birthstone + Initials: Perfect for meaningful gifts or signature pieces.
- Changeable charms on hoops: Offer customers the option to swap styles.
- Minimalist studs with tiny stones: Subtle, stylish, and perfect for daily wear.
- Nature or moon-themed sets: Use leaf, star, or crescent charms — always popular and timeless.
✅ Final Tips to Remember
✔ Start small – Don’t overthink it. One charm can make a big difference.
✔ Test different styles – Play with lengths, colors, and layers.
✔ Make it yours – Whether for yourself or to sell, your designs should reflect your brand and your vibe.
📚 Helpful Resources
- InariShines: Why Personalized Jewelry Matters
- Beadaholique: How to Use Charms in Jewelry Making
- YouTalent: Crystal Earrings Tutorial